The Ultimate Guide to Contouring for a Sculpted Face | |
| |
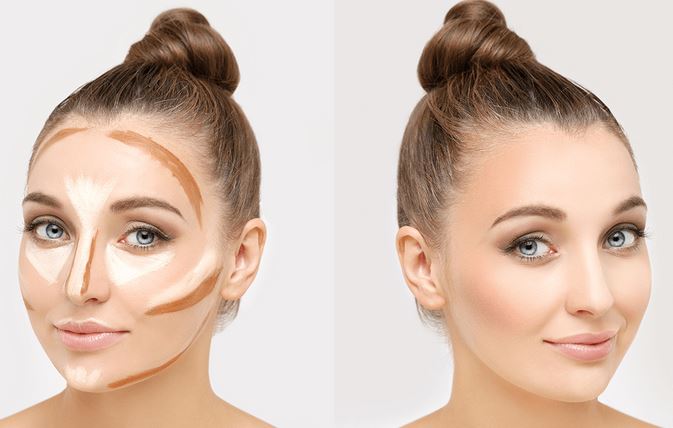
1. IntroductionAchieving a sculpted face with well-defined features is a desire for many makeup enthusiasts. One technique that has gained immense popularity for this purpose is contouring. In this ultimate guide, we will walk you through the step-by-step process of contouring for a sculpted face, providing you with valuable tips and techniques to enhance your facial structure. 2. Understanding ContouringContouring involves using different shades of makeup to create shadows and highlights on the face, giving it a more chiseled appearance. By strategically applying darker shades to areas you want to recede and lighter shades to areas you want to bring forward, you can create the illusion of a more defined bone structure. 3. Choosing the Right ProductsBefore diving into the actual contouring process, it's crucial to select the right products. For powder contouring, choose a matte powder that is two shades darker than your skin tone. For cream contouring, opt for a cream product that blends easily and matches your skin tone. 4. Preparing Your FaceTo ensure a flawless contour, start with a clean and moisturized face. Apply a lightweight foundation or BB cream as a base to even out your skin tone. This will provide a smooth canvas for the contouring process. 5. Contouring TechniquesContouring with PowderSelecting the Right ShadeWhen choosing a powder contour shade, consider your skin tone and undertone. If you have fair skin, go for a cool-toned contour shade. For medium to dark skin tones, opt for a warmer contour shade. Applying Powder Contour
Contouring with CreamChoosing the Right Cream ProductFor cream contouring, choose a shade that matches your skin tone. Cream products are ideal for achieving a natural-looking contour and blend effortlessly into the skin. Applying Cream Contour
Highlighting TechniquesSelecting the Right HighlighterWhen selecting a highlighter, choose a shade that complements your skin tone. Opt for a formula that provides a natural glow without emphasizing texture or imperfections. Applying Highlighter
6. Blending and BuffingRegardless of whether you choose powder or cream contour, blending is essential to achieve a natural-looking result. Use a clean brush or sponge to blend the contour and highlighter, ensuring there are no harsh lines or visible transitions. 7. Setting the ContourTo ensure your hard work lasts all day, set your contour with a translucent powder. Gently dust the powder over the contoured areas to help them stay in place and prevent any unwanted smudging. 8. Additional Tips for a Sculpted FaceContouring for Different Face ShapesDifferent face shapes require specific contouring techniques. Research and understand your face shape to tailor your contour accordingly. For example, round faces benefit from sharper contour lines along the jawline, while square faces may require softer contours to enhance their natural angles. Daytime vs. Nighttime ContouringConsider the lighting conditions of the events you're attending. For daytime contouring, opt for a more subtle and natural-looking contour. For nighttime events or occasions with dimmer lighting, you can be more bold and dramatic with your contour. Avoiding Common Mistakes
9. ConclusionContouring is a transformative technique that allows you to sculpt and enhance your facial features. With the right products, techniques, and a little practice, you can achieve a beautifully contoured face that enhances your natural beauty. Embrace your creativity, experiment with different shades, and have fun exploring the world of contouring! 10. FAQs
| |
| Category: Makeup | |
| Total comments: 0 | |
 |
| The Secret to Achieving a Natural-looking Glow: Highlighter 101 |
 |
| Dressing for Your Body Type: Flatter Your Figure |
 |
| How to Prevent and Treat Split Ends |
 |
| The impact of social media on beauty standards |
 |
| Creating a Dramatic Evening Eye Makeup Look |
 |
| Festive Holiday Makeup Ideas: Sparkle and Shine |
 |
| How to choose Facial Massagers |
 |
| Choosing the Right Foundation Finish for Your Skin Type |
 |
| How to Choose the Right Hair Products for Thick and Coarse Hair |
